Touring with my “What’s New Microsoft Dynamics NAV 2013 Installation & Development” course, one of the frequent topics are upgrading reports from earlier versions of Navision or Dynamics NAV to Dynamics NAV 2013. On demonstrating the upgrade process, I have stumbled upon several pitfalls. Actually there are so many shortcomings, I personally find, that if the report was originally based on a standard Dynamics NAV report, it will be faster to move the changes to the new standard Dynamics NAV 2013 report. However many reports exists in customer solutions that are 100% tailor made, and here we have only one option: upgrading.
Our problems origin from one of the following issues:
- The form variable type is discontinued replaced by the page variable type.
- The FORM object is discontinued replaced by the PAGE object. Meaning that all FORM.RUN commands must be replaced by PAGE.RUN commands.
- The Request Form is discontinued replaced by the Request Page.
- Posted dimensions and ledger entry dimensions are stored differently in Dynamics NAV 2013.
- Code is no longer executed when placed in a hidden text field in the Page Header area of Visual Studio. This was possible in 2009 and very often used especially with CODE.GETDATA and CODE.SETDATA. Just to confuse matters; this only applies to printing the report. Previewing the report will look nicely (and you can actually print the report from preview – also invoices).
Upgrading to Dynamics NAV 2013 we have two situations:
- We upgrade from a report run from the Classic Client, In this case the function from Dynamics NAV 2009 “Create Layout Suggestion” if performed automatically on upgrading.
-
We upgrade from a report run from an RTC Client in Dynamics NAV 2009. Here the Dynamics NAV 2009 RTC Layout is used.
Let us take an example with two reports that originated from a 5.0 Classic:
- Report 25 Account Schedule
- Report 206 Sales Invoice
Importing the Reports into a Dynamics NAV 2013 database, the reports are not compiled. Trying to compile the report will give you the first error found by the compiler. However it is not possible to design the report. We therefor need to import the objects to a Dynamics NAV 2009 database, where all commands for both the RoleTailored Client and the Classic Client exists.
On upgrading from a report run from the Classic Client there are a number of things we need to prepare:
As mentioned, the first thing is to import the objects to a Dynamics NAV 2009 Database. The reason for this is that here we can change all variable defined as form to the page type as well as changing all FORM.RUN commands to PAGE.RUN. Then we need to remove all commands that will not work in 2013, which again means all commands referring to RequestOptionsForm.
Starting with the 25:
- the first error message refers to a variable named DimValList which has the Form type. This must changed to the page type.
- Second Error is the RequestOptionsForm control. This must be removed and replaced with an equivalent page command if necessary.
Every time, the object must be exported from the 2009 database and imported to the 2013 database for testing. Whenever the object can be imported to the 2013 database in compiled state, it is ready to be upgraded and further design.
Upgrading the report to Dynamics NAV 2013 is performed with a new function Tools/”Upgrade Reports”.
It will:
- Upgrade to the Dynamics NAV 2013 Dataset Designer. Which means that it takes all fields from the Section Designer and create them as columns in the Dataset Designer.
- Delete the Request Form
- Generate a Layout, using the Create Layout Suggestion.
After this, you must:
- Adjust the dataset to correspond to Dynamics NAV 2013, especially regarding dimensions.
- Move all labels from the dataset to the Label Designer. This is not imperative but it will upgrade the report to Dynamics NAV 2013 standards.
- Manually adjust the Layout.
- Create the Request Page.
Trying the same with report 206:
- The RequestOptionsForm control must be removed and replaced with an equivalent page command.
- Remove all dimension loops (Lines and header) from the dataset AND from the section. Remember the Variables pointing to Table 359. Alternatively, table 359 Posted Document Dimensions must be imported in the Dynamics NAV 2013 database, only to be removed again, when the dimension functionality has been replaced with Dynamics NAV 2013 functionality.
- Import and Upgrade the Report
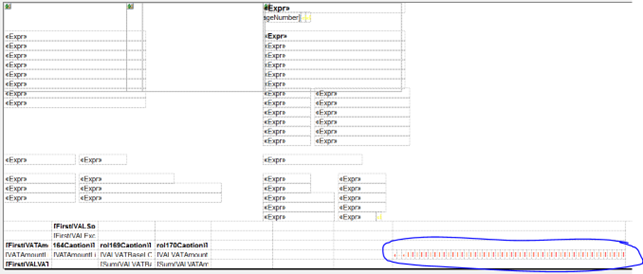
The upgrade function now try to fit everything into the page header. However without using the CODE.SETDATA and CODE.GETDATA. It therefore defined a large number of textboxes, named as variables, to be used as report items. They look something like this:

Which is not very elegant. These fields can be moved onto another Tablix control, which again can be hidden. However it is not possible to omit it and address the Field!Variable.Value from the dataset directly. This is due to the fact that it will always translate to the command first(field!Variable.Value), which will make absolutely no sense if you are printing more than one invoice at a time, because it will then repeat the customer from the first invoice on all invoices.
This boils down to what I wrote earlier: Start over using a standard Dynamics NAV 2013 report and move or add the customer adaptions again.
Using the same example with the same two reports this time originating from a 2009 RTC:
All the same issues described above also applies to the Dynamics NAV 2009 RTC reports. So on it again:
- Remove all variables with the form variable type.
- Replace all FORM.RUN by PAGE.RUN commands.
- Delete all references to RequestOptionsForm.
- Remove all references to Posted Document dimensions or Ledger Entry Dimensions.
So now we can Import the objects and upgrade them. Since the layout is already defined in the objects the upgrade process will reuse the existing layouts. And it does so quite well.
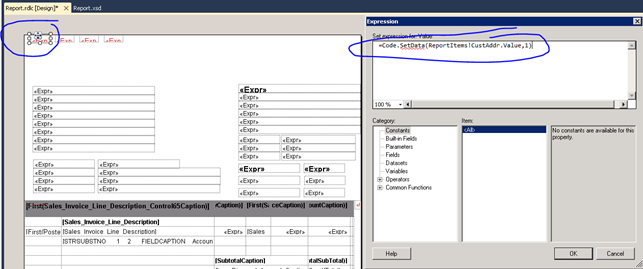
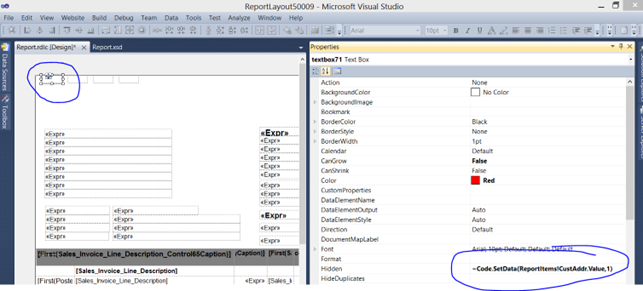
Only one thing need to be changed: Since Code is no longer executed when placed in a hidden text field in the Page Header area of Visual Studio, we now need to move the execution of the code from the value expression of the field to the hidden expression of the field:
Before:

After:

The strange thing is that it will show nicely on the preview, just not on the printed invoice.
Happy Reporting.


