As an MCT conducting the “Installation & Configuration in Microsoft Dynamics NAV 2009” and the “SQL Server Installation and Optimization for Microsoft Dynamics NAV 2009” course, I see lots of struggling in order to get Microsoft Dynamics NAV 2009 running; Especially when it comes to running the SQL server, the NAV server and the RTC client on three different machines. This is a guide on “How to install Dynamics NAV in different configurations”.
This topic has been covered in many forums and blogs, and here is a link to the different sites, where I have found inspiration:
Walkthrough: Installing the Three Tiers on Three Computers
Walkthrough: Accessing Multiple Microsoft Dynamics NAV …
Best Practices Analyzer for Microsoft Dynamics NAV … – MSDN Blogs
How to: Create or Load a Setup Configuration File.
So, let’s line up the different configurations:
Running all elements on ONE computer using NETWORK SERVICE as the service user id.

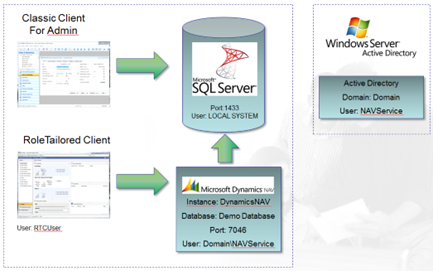
Running all elements on ONE computer using a domain user as the service user id.
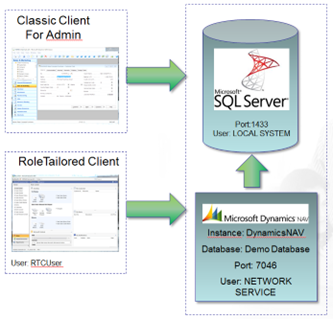

Running all elements on ONE computer using NETWORK SERVICE as the service user id.

This is the easy part. Run the setup program from the Microsoft Dynamics NAV 2009 DVD.

Do not install the demo version but choose the select an installation option.
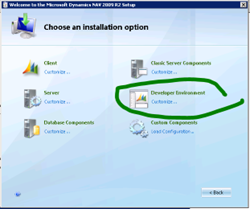
Select the Developer Environment. This will install ALL needed component for you to run Microsoft Dynamics NAV 2009.
If SQL server is not installed on the machine, the installation program will install SQL Server Express edition. This has some limitations (1 processor/ 1GB RAM and maximum 3 GB database). If this does not fulfill your needs, make sure to install SQL server before installing Microsoft Dynamics NAV 2009 on this machine.
Only one element is missing: The Visual Studio for creating Reports for the RoleTailored Client has not been installed. Here you can download and install the Visual Studio Web Developer Edition, which is free.
Running all elements on ONE computer using a domain user as the service user id.

This is another easy task.
Follow the instructions from Running all elements on ONE computer using NETWORK SERVICE as the service user id.
After this you need to:
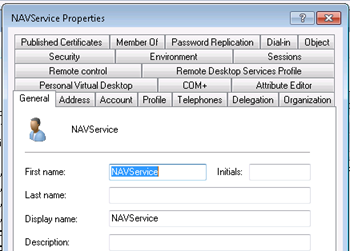
- Create a domain user account in the active directory and assign it to run the Microsoft Dynamics NAV 2009 server.
- Grant the user rights to the object listener
- Check/Change the firewall settings on the NAV Server
- Delegate domain\user for the NAV Server
- Change the ClientUserSettings.config on the RTC
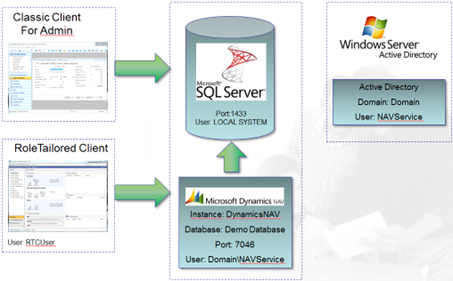
Running the NAV server and the SQL Server on ONE computer and the RTC client from a different computer, using NETWORK SERVICE as the service user id.
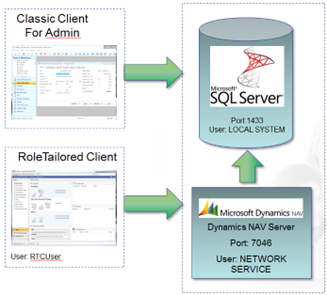
On the combined SQL server and NAV Server run the setup program from the Microsoft Dynamics NAV 2009 DVD.

Do not install the demo version but choose the select an installation option.
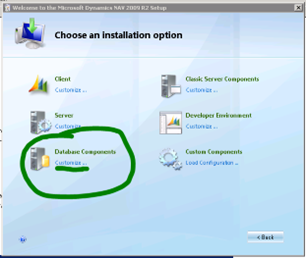
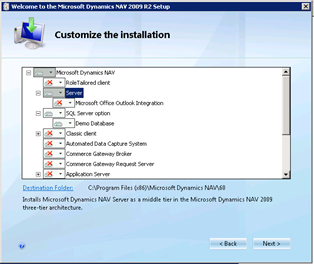
Here select the Database Component, but click the Customize option.
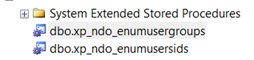
The Database Component will install the SQL Server (if needed) the SQL Database and the extended stored procedures:

If the installation of the extended stored procedures failed, please check the link: Installing the Extended Stores Procedures from xp_ndo.dll on SQL Server
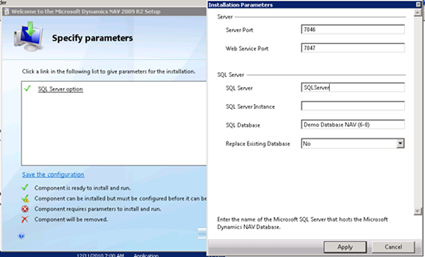
On the customize window select the Server to be run from my computer.
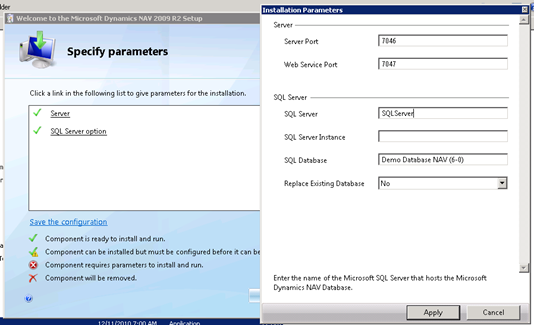
Note that if the Demo Database NAV (6-0) is already installed on the SQL Server, you will get an error, unless you specify to overwrite the existing database in the parameters window.
On the computer running the RoleTailored Client run the setup program from the Microsoft Dynamics NAV 2009 DVD as described HERE.
Running the NAV server and the SQL Server on ONE computer and the RTC client from a different computer, using a domain user as the service user id.

Follow the instructions from Running the NAV server and the SQL Server on ONE computer and the RTC client from a different computer, using NETWORK SERVICE as the service user id.
After this you need to:
- Create a domain user account in the active directory and assign it to run the Microsoft Dynamics NAV 2009 server.
- Grant the user rights to the object listener
- Check/Change the firewall settings on the NAV Server
- Delegate domain\user for the NAV Server
- Change the ClientUserSettings.config on the RTC
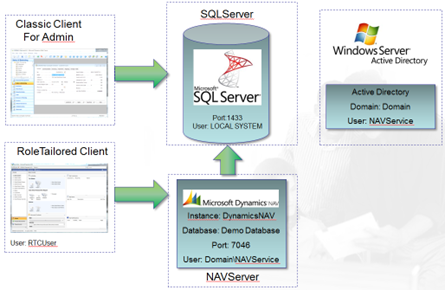
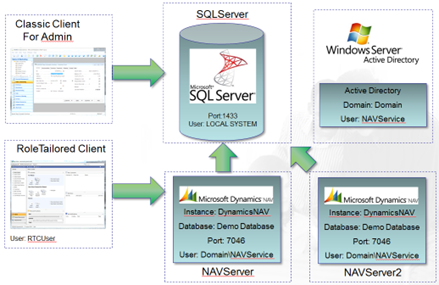
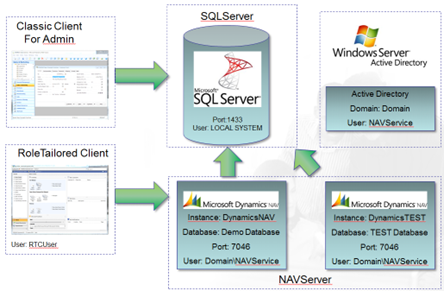
Running the SQL Server on ONE computer, the NAV server on another computer and the RTC client from a third computer, using a domain user as the service user id.

- Install the SQL Server Option on the SQL Server
- Install the Server option on the NAV Server
- Change the instance name in the NAV server if necessary
- Install the RoleTailored Client on the client machines
After this you need to:
- Create a domain user account in the active directory and assign it to run the Microsoft Dynamics NAV 2009 server.
- Grant the user rights to the object listener
- Check/Change the firewall settings on the NAV Server
- Delegate domain\user for the NAV Server
- Change the ClientUserSettings.config on the RTC
Running the SQL Server on ONE computer, TWO NAV servers on another computer and the RTC client from a third computer, using a domain user as the service user id.
Follow the instructions from Running the SQL Server on ONE computer, the NAV server on another computer and the RTC client from a third computer, using a domain user as the service user id.
After this you need to:
- Change the NAV server to support TcpPortSharing
- Create a NEW NAV server instance supporting TcpPortSharing
- Change the Instance name of the NEW NAV server
- Create the corresponding SPN to the DynamicsTEST instance as described in: Delegate Domain\USER for NAV Server.
- Now test if the new NAV Server instance is accessible from the Roletailored Client
Running the SQL Server on ONE computer, TWO NAV servers on TWO different computers and the RTC client from a forth computer, using a domain user as the service user id.

Follow the instructions from Running the SQL Server on ONE computer, the NAV server on another computer and the RTC client from a third computer, using a domain user as the service user id
After this you need to:
- Install the Server option on the NAV Server on the new machine
- Change the instance name in the NAV server if necessary
- Delegate domain\user for the NAV Server2
Creating and assigning a domain user for running the Microsoft Dynamics NAV server:
Create Domain\USER in Active Directory
Grant Domain\USER Member of Domain Admins
Grant Domain\USER Access to Dynamics NAV
Grant Domain\USER rights as SUPER in Dynamics NAV
Grant Domain\USER rights as SysAdmin in SQL Server and dbowner on SQL database
Add Domain\USER to the Administrators group locally on the NAV Server
Grant Domain\USER full access to the Folder of the Microsoft Dynamics NAV Server service:
If 32 bit operating system
C:\Program Files\Microsoft Dynamics NAV\60\Service
If 64 bit operating system
C:\Program Files (x86)\Microsoft Dynamics NAV\60\Service
Change NAV Server Service with log on as Domain\USER
Restart service
The following scripts can be run in the SQL Server Management Studio for creating the user:
| The following is not necessary if user has been created through Navision Security
USE MASTER CREATE LOGIN [ReplaceWithNAVServerAccount] FROM WINDOWS; GO |
|
Grant the domain user access to the Object listener:
Create a new Scheme: ndo$navlistner (If the Scheme exists already, it should be dropped first):
|
Grant Domain\USER rights to SELECT the Object Tracking Table
|
This could also be done through the SQL Server Management Studio
Change Firewall settings:
Open port 7046 In Firewall of the NAV Server (this is done automatically on installing the NAV server from the setup program. Remember to open port 7047 In Firewall of the NAV Server if it is running Web-services as well.
Delegate Domain\USER for NAV Server:
First set the SPN for the tcp name of the NAV server
>setspn -S DynamicsNAV/NavServer.contoso.com:7046 Domain\USER
Secondly set the SPN for the netbios name of the NAV server
>setspn -S DynamicsNAV/NavServer:7046 Domain\USER
Lastly set the SPN for the of the SQL server
>setspn -S MSSQLSvc /SQLServer.contoso.com:1433 Domain\USER
Make sure that there are NO other SPNs for the SQL server.
Using the -A parameter would also do the job, but the -S will check for duplicate SPNs as well.
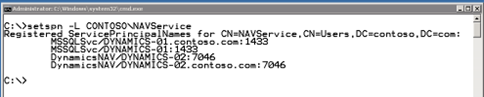
A list of all delegations for this user can be seen by using the command:
>setspn -L Domain\USER
Kerberos tickets that have been made live in the AD for 10 hours, therefor it might be necessary to delete the old ones.
To see all active Kerberos tickets use the command:
>klist
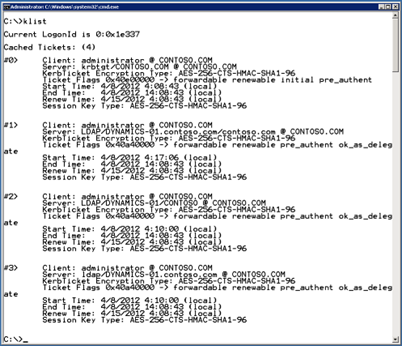
If any tickets exist, delete all tickets on all machines.
Deleting all active Kerberos tickets:
>klist purge
Lastly go to Active directory and add constrained delegations from the NAVService user.
The delegation tab will only be available after creating the SPN with the above commands.
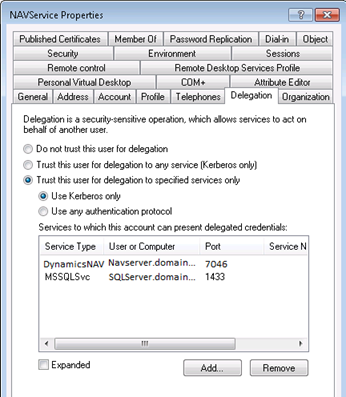
The “Trust this user for delegation to any service (Kerberos Only)” can be used for testing, but should not be used in a live environment.
Change the settings in the RTC setupfile:
Add keys in ClientUserSettings.config for the RTC. Found in C:\ProgramData\Microsoft\Microsoft Dynamics NAV:
<add key=”DelegateInfo” value=”DomainUser”></add>
<add key=”Allowntlm” value=”false”></add>
Installing the Extended Stores Procedures from xp_ndo.dll or xp_ndo_x64.dll on SQL Server
If the extended stored procedures have not been installed correctly, there are two ways to install them manually:
Firstly locate the file xp_ndo.dll on the Microsoft Dynamics NAV installation CD. If you are running a 64 bit operating system locate the file xp_ndo_x64.dll. Store the file in “C:\Program Files\Microsoft SQL Server\MSSQL\Binn\xp_ndo.dll” or anywhere convenient for you (then you will just need to change the path below).
From SQL Server Management Studio create a new query and paste the following
| USE master EXEC sp_addextendedproc xp_ndo_enumusergroups, ‘C:\Program Files\Microsoft SQL Server\MSSQL\Binn\xp_ndo.dll’ GO GRANT EXECUTE |
| USE master EXEC sp_addextendedproc xp_ndo_enumusersids, ‘C:\Program Files\Microsoft SQL Server\MSSQL\Binn\xp_ndo.dll’ GO GRANT EXECUTE |
Alte  rnatively you can install it directly in SQL Server Management Studio:
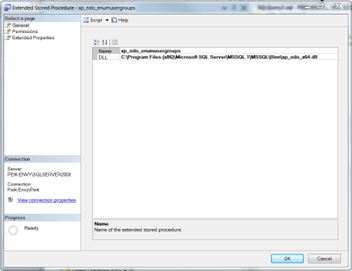
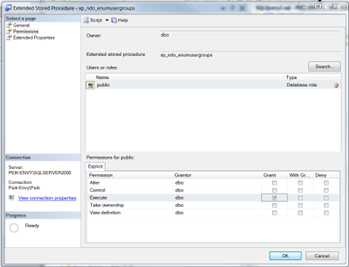
And do the same for xp_ndo_enumusersids.
Install the RoleTailored Client on the client machine.
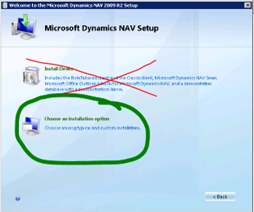
On the computer running the RoleTailored Client, run the setup program from the Microsoft Dynamics NAV 2009 DVD.

Again do not install the demo version but choose the select an installation option.
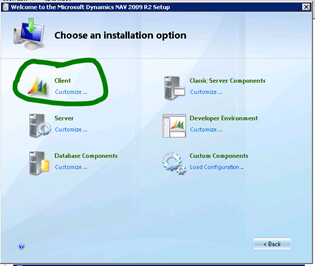
Select the Client option
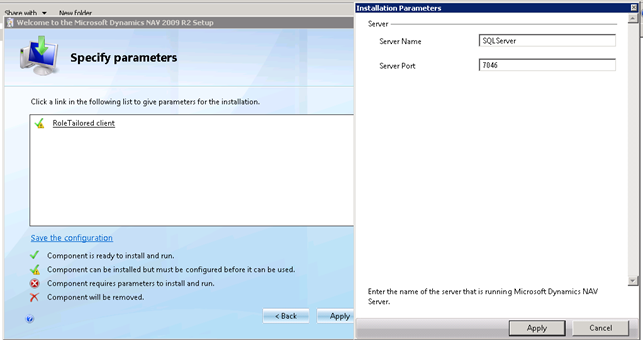
And enter the SQL server Name in the parameters window.
Install the SQL Server Option
On the SQL server run the setup program from the Microsoft Dynamics NAV 2009 DVD.
Do not install the demo version but choose the select an installation option.

Here select the Database Component.
The Database Component will install the SQL Server (if needed) the SQL Database and the extended stored procedures:
If the installation of the extended stored procedures failed, please check the link: Installing the Extended Stores Procedures from xp_ndo.dll on SQL Server
Note that if the Demo Database NAV (6-0) is already installed on the SQL Server, you will get an error, unless you specify to overwrite the existing database in the parameters window.
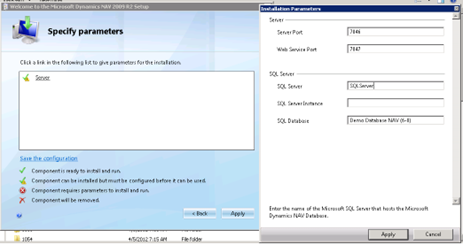
Install the Server Option as an instance of the Microsoft Dynamics NAV Server, which is a part of the middle tier.
On the SQL server run the setup program from the Microsoft Dynamics NAV 2009 DVD.

Do not install the demo version but choose the select an installation option.

Select the correct port, SQL server and Database. Here you cannot change the instance name. This must be done later, if necessary.
Changing the instance name of an installed Microsoft Dynamics NAV server
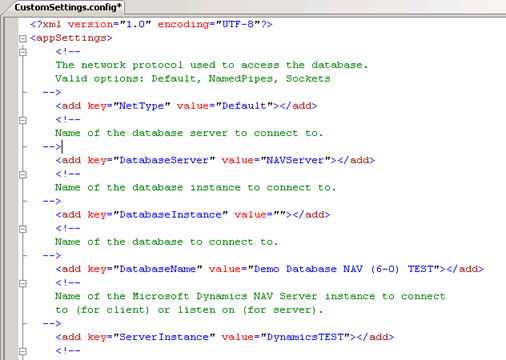
The only way to change the instance name of an installed Microsoft Dynamics NAV server is in the CustomSettings.config file.
This will usually be placed in the service folder:
C:\Program Files (x86)\Microsoft Dynamics NAV\60\Service
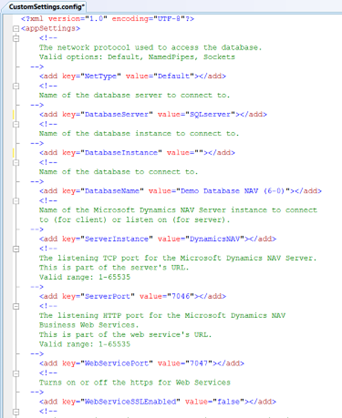
Change the instance name and restart the NAV Server service
Change an existing NAV server to support TcpPortSharing
This topic is also covered in the Walkthrough: Accessing Multiple Microsoft Dynamics NAV Databases from a Single Microsoft Dynamics NAV Server Computer
In order to change an existing service the SC command is used.
| sc \\<computername> create MicrosoftDynamicsNAVServer$NAV2 binpath= “C:\Program Files\Microsoft Dynamics NAV\60\Service2\Microsoft.Dynamics.Nav.Server.exe $NAV2” DisplayName= “Microsoft Dynamics NAV Server Instance 2” start= auto type= own depend= NetTcpPortSharing |
The SC command is a little bit special because any parameters must be written in a special way e.g.:
Start= auto
Note the space after the =. THIS MUST NOT BE OMITTED.
First we need to find the service name, so go to services and find the NAV Server and view properties for this:
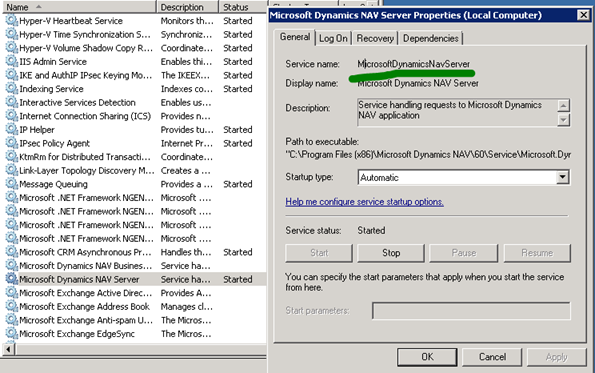
Note the Service name.
Now go to a cmd.exe raised to administrator level and type the following command:

You must write the computername in the \\<computername> NEVER localhost.
After hitting enter you get

Now go to the properties of the service again and go to the dependencies tab:
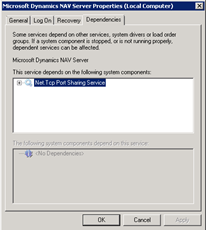
Here you can see that tcp port sharing is now enabled.
Restart the service.
Check that you can still access the NAV Server from the RoleTailored Client
Create an additional NAV Server on the computer of the existing NAV Server
This topic is also covered in the Walkthrough: Accessing Multiple Microsoft Dynamics NAV Databases from a Single Microsoft Dynamics NAV Server Computer
Firstly ensure that the database you want to connect to is installed on the SQL server. Any other SQL server can be used as well as long as it has been prepared for running Microsoft Dynamics NAV.
Then go to and find the existing service folder. Usually somewhere like here:
C:\Program Files (x86)\Microsoft Dynamics NAV\60
Copy the whole service folder into a new folder called service2
Go to service2 and edit the CustomSettings.config file
In order to create a new service the SC command is used.
| sc \\NAVServer create MicrosoftDynamicsNAVServer$NAV2 binpath= “C:\Program Files\Microsoft Dynamics NAV\60\Service2\Microsoft.Dynamics.Nav.Server.exe $NAV2” DisplayName= “Microsoft Dynamics NAV Server Instance 2” start= auto type= own depend= NetTcpPortSharing |
The SC command is a little bit special because any parameters must be written in a special way e.g.:
Start= auto
Note the space after the =. THIS MUST NOT BE OMITTED.
After you get
[SC] CreateService SUCCESS
The Service is installed and must be configured and started:

Set the domain\user to run the service, enter the password press apply and start the service